Initiate a grant recommendation
This tutorial guides you in recommending a grant on behalf of your client through our advisor platform, GivingCentral. If you have not already done so, you’ll need to register on GivingCentral.
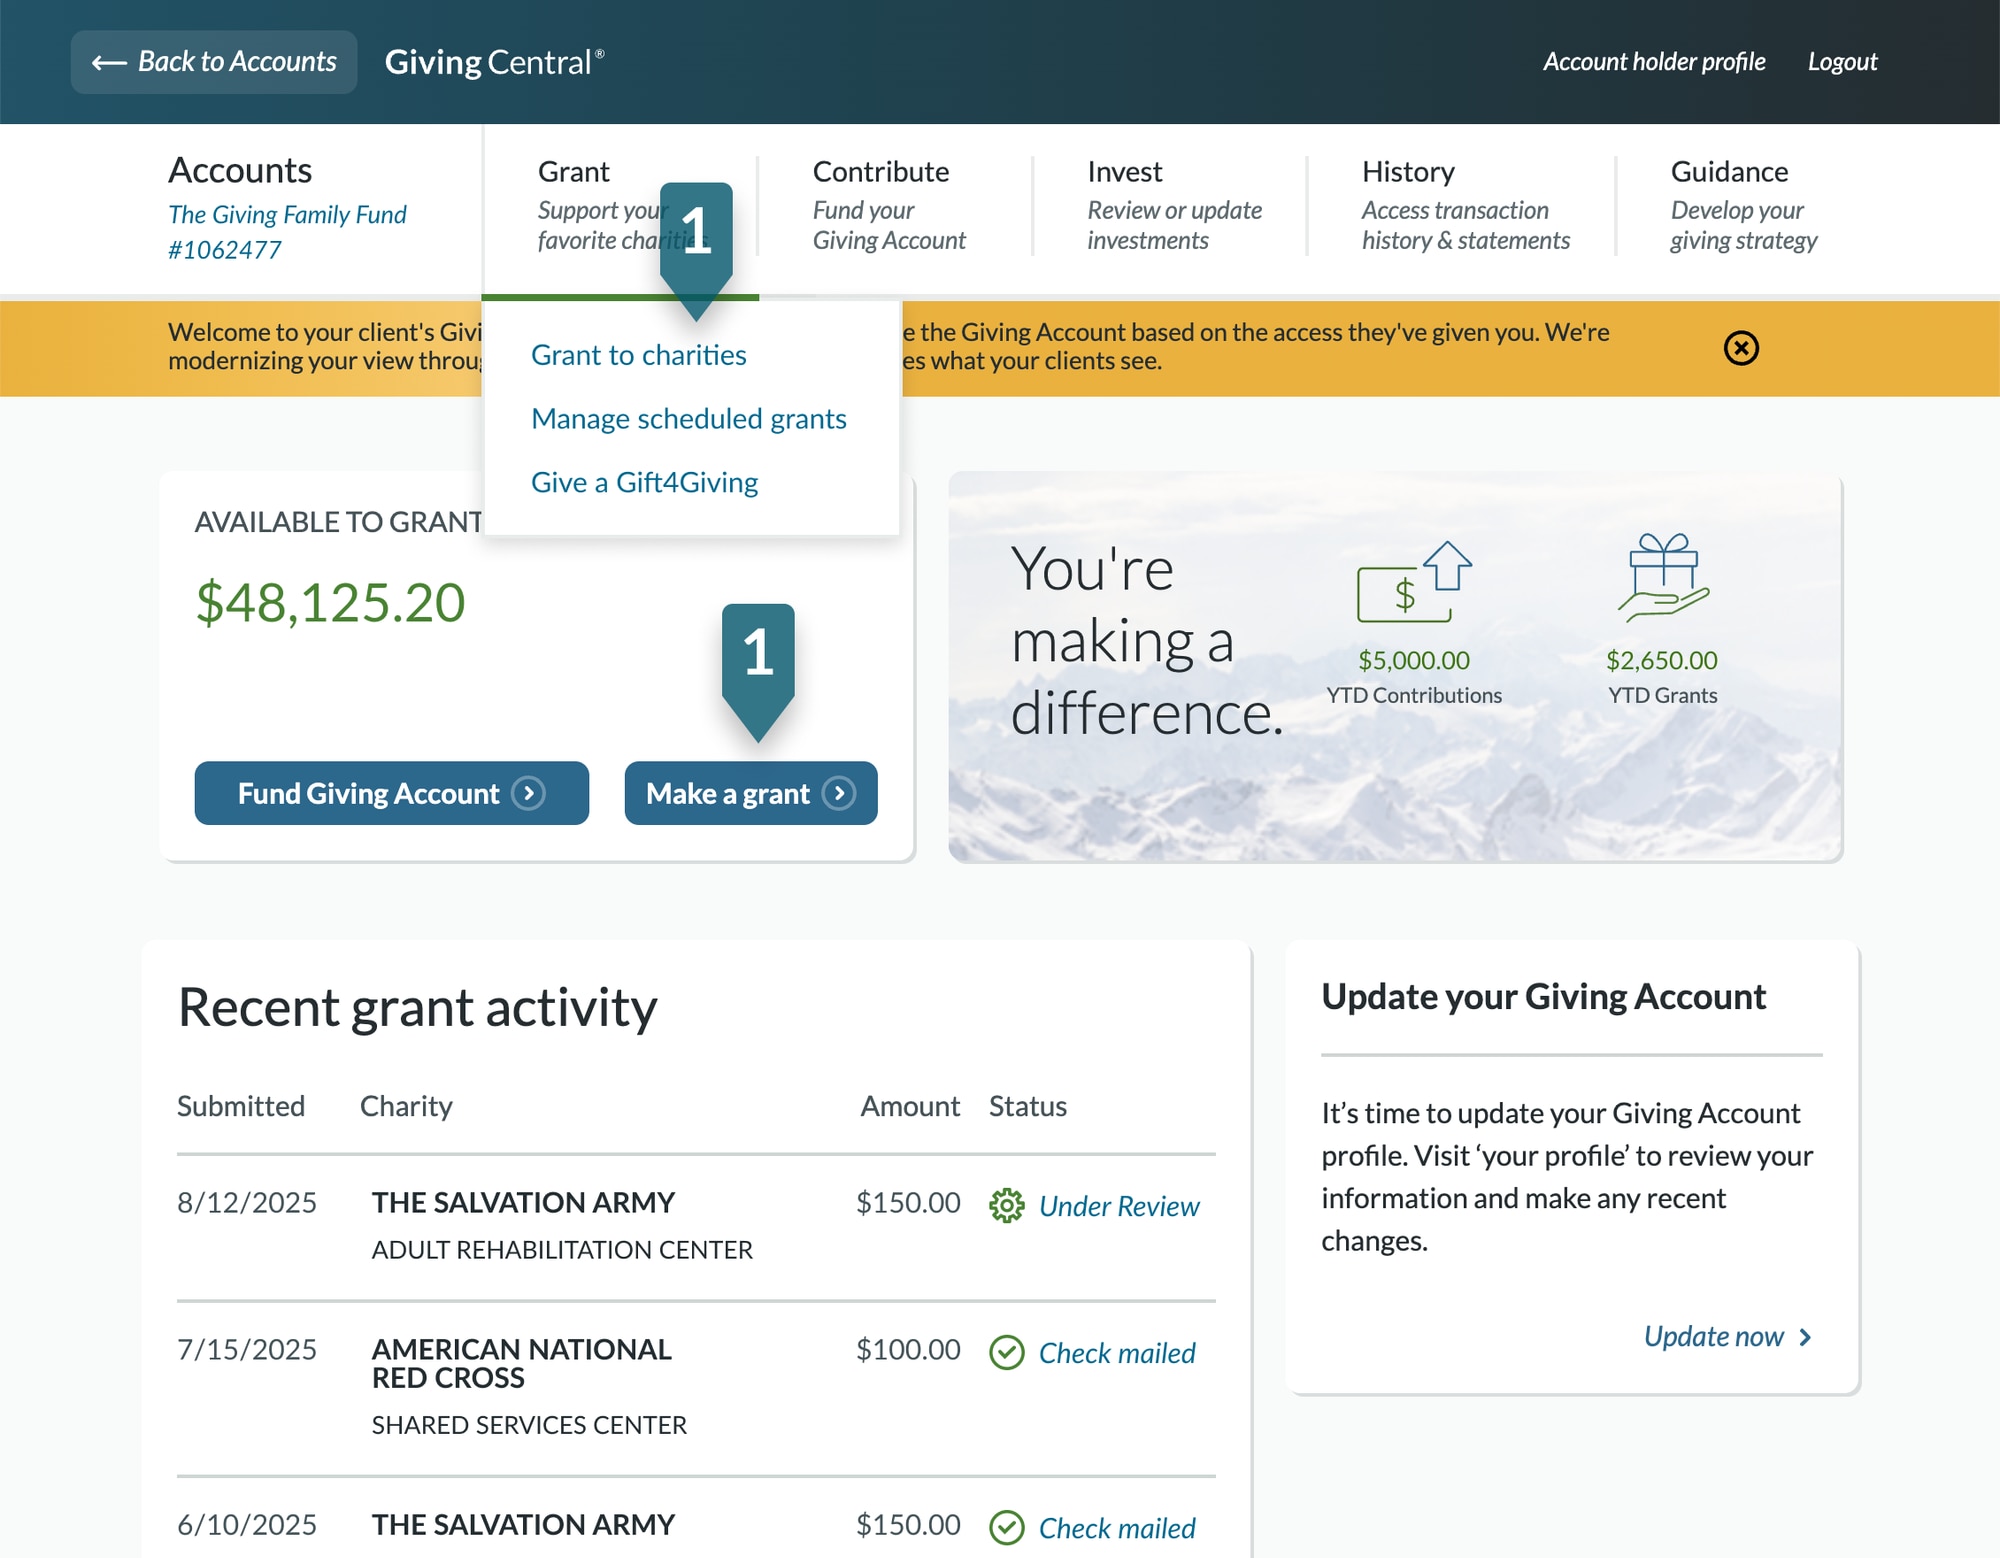
1. Initiate the grant
From your GivingCentral dashboard, scroll to Active Giving Account, the list of the Giving Account for which you have transactional access. Select the Giving Account your client intends to use to fund this grant recommendation.
On the Account Summary page, click the Make a Grant button or hover over the Grant menu tab and select Grant to charities. (If you do not see these options, you will need to request transactional access from your client.)
Add a new charity to the grant list
To recommend a grant to an organization, the charity must first be in the client’s grant list. You can either search for a new charity to add to the list or, if the client has supported this organization in the past, you can locate it within their charity list.

1. Add a new charity
Click on the “Find a charity” button to find organizations your client wants to support and proceed to the next page of the tutorial.
2. Find a charity your client has previously supported
If your client has previously supported the charity, you can find the organization in the client’s grant list. Type in the search bar above the list and customize the search timeframe with the “Viewing” dropdown to change the timeframe of the charity list. Click “Help” for further information anytime in the process.
Find the new charity your client wants to support

1. Search for a new organization
Use the search functionality to find a new charity your client would like to support. Our database includes over 1.8 million non-profit organizations. You can search by entering the charity name, address, or federal tax ID and then selecting “Search”.
2. Filter the search results
You can narrow your search by state if your client is looking for a local chapter of a larger national organization. You can also refine by sector. If the organization is not listed in the search results, you have the option to enter it manually, by clicking “Recommend a charity” at the bottom.
To learn more about a charity, view “Research Charity” with information from GuideStar®.
3. Add the charity to the grant list
Once the correct organization is found, click on the “Select” button to the right.
Validate the organization’s information is correct
Ensure the charity information is correct for the organization your client wants to support.

1. Validate the pre-populated nonprofit information
Click “Charity details” to review the organization’s legal name and mailing address and confirm it is the organization your client would like to support in the popup. The default information is provided by the IRS.
2. If preferred, add additional contact information
If desired or requested by your client, add a contact name and/or phone number for the organization. Save any changes.
Note, this additional information is not required and is used for routing purposes only. Payments are made to the order of the organization name only.
Tip: Make changes only if you are confident the legal mailing address has changed. Entering a new address for the organization requires additional due diligence and may delay processing of the grant recommendation.
Specify the amount and how the grant should be used
The designation informs the organization how the funding is to be used.

1. Indicate the grant amount
Enter the grant recommendation dollar amount in the “Amount” box. If the client has a managed account or multiple accounts, indicate the source of the funds. If you need to change this later, there is an option to “Edit” after the grant is added.
IMPORTANT: The full Giving Account balance cannot be granted in GivingCentral. Please contact Fidelity Charitable for assistance if your client would like to grant the full balance.
2. Select the grant use
From the drop-down menu, select a category that tells the charity how your client would like the grant to be used. Certain fields will allow you to add more detail about the use. The default is “Where it’s needed most” which allows the organization to decide where the funds should be directed.
Tip: Ensure the purpose of the grant is permissible. While you can customize a designation or create your own, these recommendations require additional due diligence and may delay processing of the grant recommendation.
Specify the amount and how the grant should be used (cont.)
The designation informs the organization how the funding is to be used.
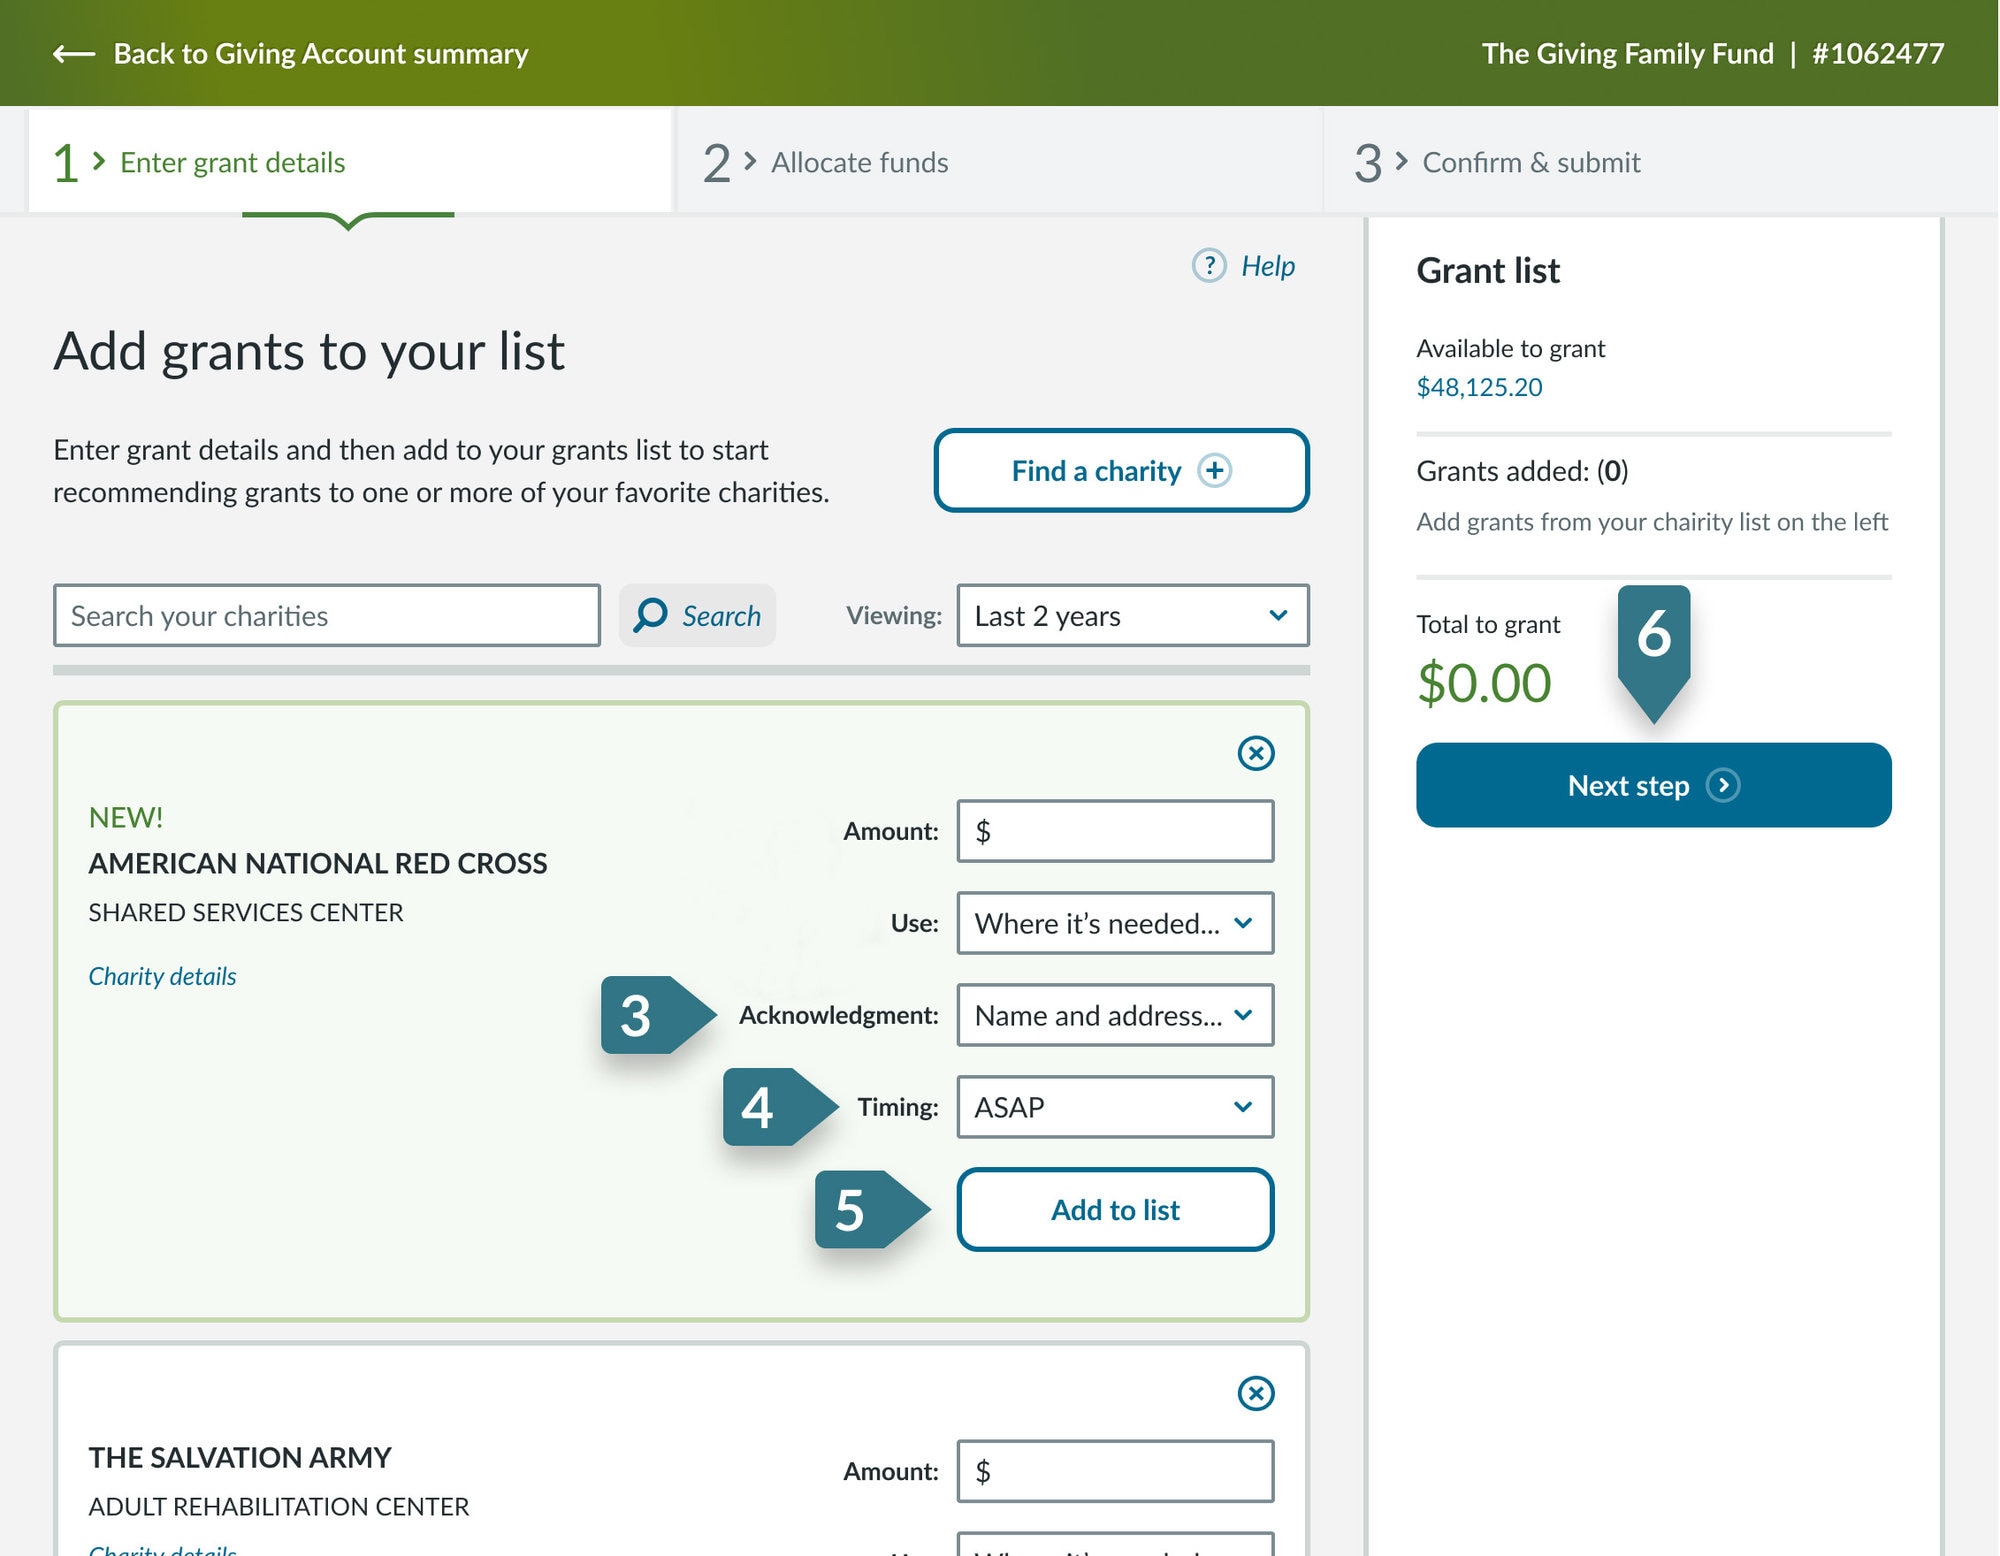
3. Indicate how your client should be acknowledged
Your client has several options for acknowledgement – their full name and mailing address, their Giving Account name only, or to remain anonymous. The “Edit” button allows you to verify your client’s address is correct.
4. Specify the grant timing
Select when your client would like funds to be distributed. You have three options for grant timing: submit a one-time grant as soon as possible, schedule a one-time grant for the future, or create a recurring grant. The default selection is a one-time grant issued “ASAP (as soon as possible).”
5. Add the grant to the grant list
If your client would like to make additional grant recommendations, you can repeat the previous steps to add multiple grants to the grant list.
6. When all grant details are complete, select “Next steps”.
Tip: Typical grant processing time is 2–10 business days. Plan accordingly if additional due diligence may be required.
Allocate funds from the Giving Account
If the funds in the client’s Giving Account are invested in more than one pool, you can identify which pools the grant recommendation should be funded from. If the client only has one investment pool or a managed account, you will not see this screen. You have two options for investment allocation:

1. Allocate per current percentages
Allows you to quickly allocate funds based on your current pool market values. Recommending the same allocations helps maintain the current investment strategy.
2. Specific allocations
Pool allocations can be entered in by a percentage or a dollar amount. Allocation cannot exceed the available pool market value.
3. Review total
The total must add up to 100%.
Tip: Check the status of a grant recommendation anytime in GivingCentral.
Confirm all details are correct and submit
The final summary page displays all details regarding the grant details and pool allocations from the previous steps. This is your opportunity to ensure all information is correct before you submit on behalf of your client.

1. Review and confirm all grant recommendation details and edit if necessary
You can view and edit grant details and charity details if you need to make changes before submitting the grant recommendation.
2. Add your certification
Once you have proceeded to the next step, you will be asked to agree to several certifications. You can submit the grant recommendation after agreeing to the statements.
3. Submit the grant
Click “Submit grant” to send the grant recommendation to Fidelity Charitable for processing.
Grant recommendation submitted
Congratulations, your client’s grant recommendation has been submitted to Fidelity Charitable for processing.

1. Review grant history
Access the details of your client’s grant recommendation at any time on the grant history page.
2. Print, if desired
Click the “Print” button to keep a hard copy for your records.